Spider mites are both common and disastrous when it comes to growing marijuana plants. Not only that but they are an absolute nightmare to try and get rid of. Technically these little mites aren’t actual insects — they are arachnids, like spiders, ticks, and other types of mites. They are recognizable from other mites by the web they leave behind on your marijuana plants.
Spider mites can wreak havoc on your marijuana plants. They may not be big themselves, but the damage they can do is huge. It all comes down to numbers. When the spider mite population becomes out of control (which is often the time marijuana growers finally notice them at all), their sheer numbers can decimate your marijuana plants.
If you need to be sure about what’s wrong with your plants, be sure to advise our symptom checker.
What are spider mites and why are they so harmful?
Spider mites reproduce in seemingly the blink of an eye, so their population can explode very quickly. In other words, by the time you notice them, it’s already a huge problem. Once spider mite eggs are laid, they hatch just days afterward.
Just over a week after those very eggs were laid, the mites that came out of them have now reached sexual maturity. In other words, it takes eight days for a new generation to begin reproducing. You can see why this could become a big problem, and how they can reproduce so quickly.
Not only that, but sexually mature spider mites reproduce in huge numbers. One mite could literally lay millions of eggs over the span of 30 days. They also thrive on chlorophyll, which of course is present in your marijuana plants. For that reason, they do quite well eating up the chlorophyll of your slowly dying marijuana plants.
Spider mites bite into your marijuana plants with their teeth. Perhaps more accurately, the spider mites are biting into one individual plant cell to take out the chlorophyll within. Multiply this by the millions and you can have an entire crop ruined very quickly.
Unfortunately for the marijuana grower, no crop is safe from the spider mite. However, hydroponics growers are far less likely to have to deal with spider mites than people growing in other types of mediums or outdoors. Spider mites are attracted to dead organic matter, to begin with, which is why soil mediums are so susceptible to these pests.
It is not unusual for an entire marijuana plant to be killed overnight by a really bad spider mite infestation. They are also absurdly difficult to kill off, as they adapt to just about anything you throw at them. This is why it is critical to completely kill off every single mite when you treat your plants for the pests, rather than leaving a few behind to reproduce and help speed along evolution. Some spider mites are immune to a variety of methods, and growers don’t kill them all off. Don’t expect to use any of the standard methods on these pests.
There is one type of spider mite that is known for surviving insecticides well: the two-spotted spider mite. This type of spider mite is especially feared by the marijuana growing community and even has its own special nickname: “the Borg.”
How do you know you have a spider mite infestation?
Knowing you have a spider mite infestation early enough to do something about it is indeed the tricky part. Spider mites are extremely tiny, looking only like tiny dots — about the size of the tip of pencil lead. Unless there are thousands of them, you probably won’t see them unless you explicitly check for them.
For that reason, you absolutely should be inspecting the leaves of your marijuana plants on a regular basis. While the mites themselves are tiny, the damage they do is usually noticeable on the leaves. Check both the top side of the leaf as well as the underside, and do this frequently (or else they could infest, reproduce, and decimate your crop before your next scheduled leaf inspection).
Usually, spider mites can be found on the underside of the leaves of your marijuana plants. They make a web (thus their name, “spider mite”) where they lay their eggs and protect their colony. This web is also possible to notice with the naked eye. It will look like little white strings between leaves until you flip the leaf over and see the actual “nest.”
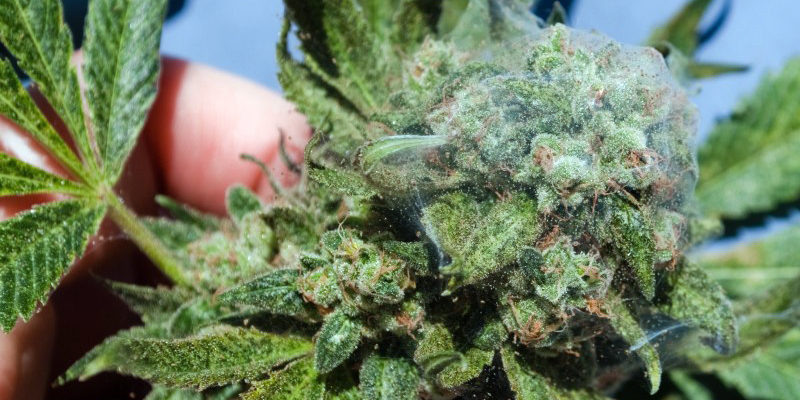
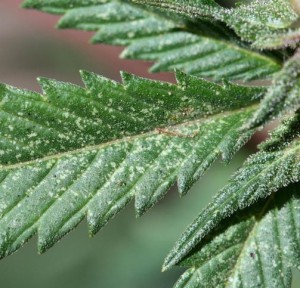
As soon as you notice any of this tiny, delicate, white stringy web material, there is already a problem at hand. Sometimes marijuana plants with a spider mite infestation will simply look dirty or dusty. This is because the fine silk that is on the leaves of the plant is sticky, so dirt and dust will stick to it after a while, giving the plant a coating of it.
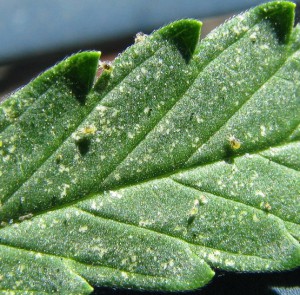
During your leaf inspection, check for little specks of white or yellow. These specks are actually where the spider mites have bit the plant. Eventually, your plant won’t only have discolored specks, but will also develop discoloration overall. It simply will look unhealthy and ill, and if left alone, it could eventually die.
Marijuana plants with a spider mite problem will have dark brown spots on their leaves, mosaic patterns or mottling on their leaves, webbing, and slowed leaf growth. The entire plant will be growing slower and will start drooping or wilting, and if they’re in their flowering phase, the buds won’t be getting any bigger or fatter. If you see these symptoms, you should inspect the plant carefully for spider mites.
More tips for dealing with pests can be found in my free to download Grow Bible.
Preventing and getting rid of spider mites
Major, plant-killing infestations of spider mites are tough to get rid of, but they are much easier to prevent in the first place. Believe it or not, there are beneficial mites that prey on other mites (including spider mites). These helpful mites can be found in an organic compost mulch, so by using that you are already improving the defenses of your plants and soil.
Other common sense prevention tips are equally important. For example, don’t ever bring in marijuana plants from the outdoors and put it indoors in your grow room. If you do need to bring a plant indoors (such as when you get a clone), make sure it is kept separate from the other plants for at least two full weeks. Inspect it carefully (even with a microscope) to be absolutely certain there are no spider mites around before you bring it into the grow room with the other marijuana plants. Ignoring this crucial quarantine step is actually the most common way for spider mites to spread and infest indoor setups.
You should also remember that you could carry spider mites with you from outside into your grow room. For that reason, don’t ever enter your grow room straight from coming from outside. You should first make sure that you are completely clean and free of spider mites. Pets should not be allowed in the grow room at all for similar reasons.
A ventilation system using air from outside could also allow spider mites to get in. The easiest way to prevent this is to add a filter. Keep the temperature lower because spider mites prefer warm conditions. Additionally, plants that are grown from seed won’t start out with spider mites, while plants grown from clones could have a couple spider mites hiding on them that will lead to a full-blown infestation. Grow your marijuana plants from seeds whenever possible.
Stay on top of the cleanup of your grow room. In particular, make sure you are picking up the dead leaves pretty much as soon as they fall. Move them somewhere far away from your plants (out of the grow room), so as not to expose them to spider mites.
If the infestation is already there, you can use predatory creatures of some sort to eat up the spider mites. One such predator is the lady bug. You can introduce them to your marijuana plants as soon as you notice a spider mite infestation. They will gladly gobble up all of the spider mites, and as soon as they are done, they will fly away to look for more food. Ladybugs don’t work for the prevention of spider mites since they don’t stick around without there already being a reason to.
When growing outdoors, you might get lucky enough to have wild ladybugs notice the spider mites on your marijuana plants. They will take care of the problem and then move on, allowing you to appreciate the fact that you didn’t have to put in any effort to get rid of those pesky spider mites. Don’t count on this, though — always take action as soon as you can.
Once you notice the spider mites on your plants, take immediate action. Spray them with a hard water spray, which won’t hurt your plants but will be too much pressure for the little spider mites to hang on. They will die on the ground because there is no food for them there. Bug Blaster, a commercial version, will do the trick as well.
Even a handheld vacuum cleaner can do the trick to physically remove all of the spider mites. It takes a lot of effort on your part, of course, as you must go through each and every leaf on your marijuana plants, but that should at least get them away from your plants straight away. Don’t stop there, though; put the vacuum contents in a Ziploc freezer bag, and place it in the freezer. Allow them to be in there for enough time to die off (they hate the cold), and then discard the bag with your regular trash.
After you eradicate the spider mites, of course, you could always end up with the supposedly dead coming back to life. That is, their millions of eggs will have hatched a few days after you killed all of their parents. The ladybugs won’t even be around to eat them up anymore, as there is just a long enough delay before the spider mites hatch for them to go search for more food elsewhere.
You could always buy more ladybugs, but of course, at this point, it’s a race against the clock since the spider mite population is already huge. Get a spray from your local garden center or else use neem oil to kill the spider mites (they will die as soon as they are exposed to the spray). Shake the plant first, then spray after that. Don’t get too close to your own weapon; neem oil is dangerous to humans.
You can also try mixing a tablespoon of bleach with a gallon of water (which should be 95 degrees Fahrenheit and pH neutral) to spray them with. Other mixtures include alcohol and water (make sure at least a third of this solution is water, or else you’re putting the plant at risk). Even make pepper spray with one part cayenne pepper, one part dishwashing soap (without additives), and nine parts water.
Nicotine tea is also a popular choice. Make it with organic tobacco (15 grams) steeped overnight in hot water. Dichotomous earth, which is essentially fossil dust, can also work by being sprinkled and spread over your infested plants, or an insecticide should also do the job. Insecticides are only to be used as a last resort, however.
Please be aware of what any product contains. Abamectin and Lindane, for example, are dangerous to humans, so use any products with those ingredients with care and caution.
Whatever you decide to use, choose one and do it for two or three days straight. After that, continue using the original method but also start using a second method, just to be sure. Do this multiple times. Remember, even one or two mites left could mean another boom in their population — and resistance to your treatment. After you don’t see any symptoms of spider mites anymore, do the treatment once more.
Much like taking all of your antibiotics when you’re sick, even after the symptoms go away, you need to keep the treatment regimen up after the spider mites go away. Without doing that, resistance develops, and it will be much harder the second time around to get rid of them.
Thanks for reading. Learn more troubleshooting during your grow in my free Grow Bible and let me know your thoughts.
Robert Bergman
www.ilovegrowingmarijuana.com